Wednesday, March 29, 2017

[Solved] How to access the information in /ar_pose_marker topic?

Image result for ar_pose_marker

In ROS, using ar_pose package in ar_tools, many wanted to access the info of AR_Markers position and its orientation by subscribing to the topic published by launching the file in ar_pose, which is /ar_pose_marker. Below is an example to access the data present in the topic.

void chatterCallback(const ar_pose::ARMarkers::ConstPtr& msg)
{
 ar_pose::ARMarker ar_marker;
 if (!msg->markers.empty())
 {
  ar_marker = msg->markers[0];
  ROS_INFO("X : [%f] ", ar_marker.pose.pose.position.x);
  ROS_INFO("Y : [%f] ", ar_marker.pose.pose.position.y);
  ROS_INFO("Z : [%f] ", ar_marker.pose.pose.position.z); 
 }
}
Wednesday, May 13, 2015

Object / Face Tracking by Nao using Choregraphe

VERY IMPORTANT: FOR ALL STEPS, YOU MUST HAVE SOMEONE "SPOT" THE ROBOT, MEANING THAT THE SPOTTER IS ACTIVELY READY TO CATCH THE ROBOT IN CASE IT STARTS TO FALL.

Choregraphe has modules that allow Naos to track (recognize and follow) certain objects. The objects that they are trained to recognize with no further training are specific types of red balls and human faces. In this tutorial, you will be using the Nao to track your face.
  1. Open Choregraphe by opening a terminal and typing choregraphe.

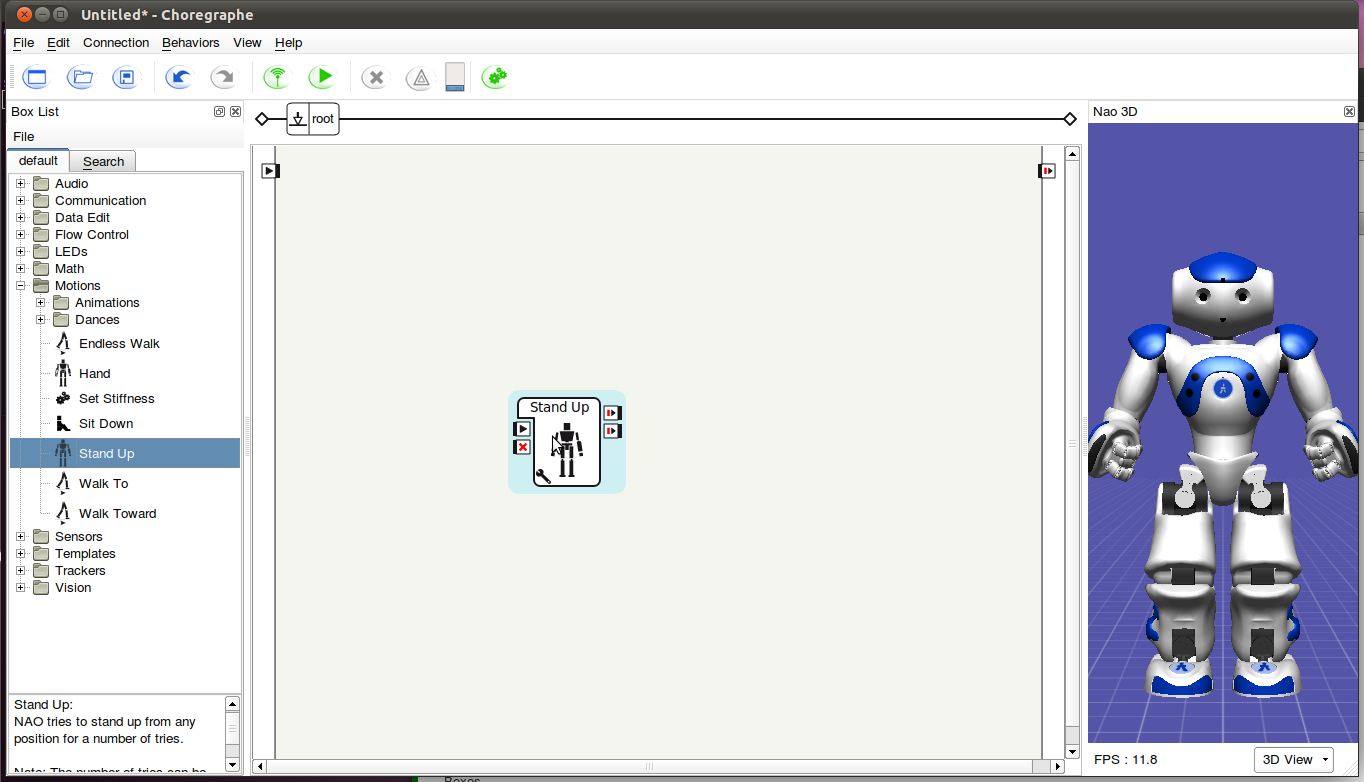
  2. During our movement, we want the Nao to be standing, so the first thing we should do is add a Stand Up motion. In the box list on the left side of the Choregraphe window, select Motions -> Stand Up and then drag and drop it onto the flow diagram panel. Notice that there are several inputs and outputs to the stand up box, as well as a wrench. Clicking on a wrench in the box allows you to set parameters for that box. For Stand Up, the parameter is how many times the Nao should try to stand up before giving up. The default parameter is 3, which is fine for us, so we will not change it. Mouse over the different input and output options to see their tool-tips.


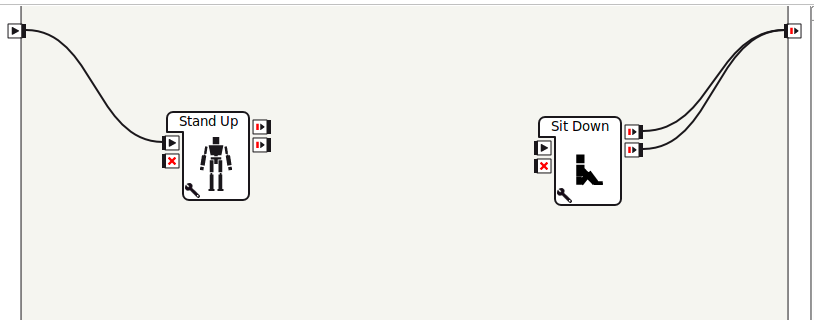
  3. We also want to the Nao to finish in a sitting position, so we need to add a Sit Down box. We do that by selecting Motions -> Sit Down and dragging and dropping it onto the flow diagram in the same way as the stand up box. Then, we connect Sit Down's onStopped outputs to the main onStopped output.


  4. Save the current Choregraphe movement by clicking on File -> Save project. Save the project as tracking. Save your work frequently in Choregraphe.

  5. We will now add a Tracking box. Select Tracking -> WB tracker and drag and drop it onto the flow diagram.

  6. Set up the parameters of the WB tracker by clicking on the wrench in the WB tracker box. Set the target choice to be Face and the Time before lost (s) to be 3.0. This will set up the Nao to track a human face.

  7. Connect both outputs of the Stand Up box to the input of the WB tracker box.

  8. Connect the onStopped output of the WB tracker box to the input of the Sit Down box.

  9. To stop the Nao tracking, we need to add a stopping mechanism. Select Sensors -> Tactile Head and drag and drop it onto the flow diagram.

  10. Connect the main onStart to the onStart input of the Tactile Head box.

  11. We would also like to be able to tell if the Nao has successfully found its target to track. We can do this by changing the Nao's eyes to certain colors if they have successfully found an object to track or if they have lost the object they're tracking. Select LEDs -> Eyes LEDs and drag and drop two of these boxes onto the flow diagram.

  12. Connect the foundTarget output of the WB tracker to the onStart input of the first Eyes LEDs box (mouse over the different outputs on WB tracker to see what the different outputs are). Connect the isLost output of the WB tracker to the onStart input of the second Eyes LEDs box.

  13. Double-click on the first Eyes LEDs box. If the color is not set to green, set it to green by clicking on the colored square in the Color Edit box. Click on root to return to the main flow diagram.

  14. Double-click on the second Eyes LEDs box. Set the color to blue and then click on root to return to the main flow diagram.

  15. Click on the wrench of each Eyes LEDs box to set the Duration to 0.4 seconds.

  16. Check the following image to confirm that all connections were made properly.

  17. Turn on a Nao to test.

  18. Wait for robot to connect. Once connected, make sure stiffness is enabled. Then click play.

  19. Make sure that you are in front of the Nao, at eye-level when it stands up so that it may track your face.

  20. Once it has found your face (when its eyes turn green), move slowly around to make sure the Nao is following your face. Again, one person should be prepared to catch the Nao in case of a fall.

  21. When you are through tracking, tap the Nao's head so that it will stop tracking and sit down.

  22. Remember to disconnect the Nao in Choregraphe and turn it off when you are finished.

Creating a movement from scratch - Nao Choreographe

VERY IMPORTANT: FOR ALL STEPS, YOU MUST HAVE SOMEONE "SPOT" THE ROBOT, MEANING THAT THE SPOTTER IS ACTIVELY READY TO CATCH THE ROBOT IN CASE IT STARTS TO FALL.

You can create your own movement in Nao from scratch. We will step through the details of creating a small movement involving the hands, arms, and head of the Nao.
  1. Open Choregraphe by opening a terminal and typing choregraphe.

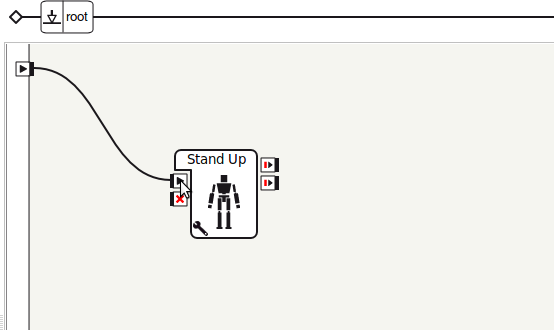
  2. During our movement, we want the Nao to be standing, so the first thing we should do is add a Stand Up motion. In the box list on the left side of the Choregraphe window, select Motions -> Stand Up and then drag and drop it onto the flow diagram panel. Notice that there are several inputs and outputs to the stand up box, as well as a wrench. Clicking on a wrench in the box allows you to set parameters for that box. For Stand Up, the parameter is how many times the Nao should try to stand up before giving up. The default parameter is 3, which is fine for us, so we will not change it. Mouse over the different input and output options to see their tool-tips.


  3. Connect Stand Up's onStart input to the main onStart.


  4. We also want to the Nao to finish in a sitting position, so we need to add a Sit Down box. We do that by selecting Motions -> Sit Down and dragging and dropping it onto the flow diagram in the same way as the stand up box. Then, we connect Sit Down's onStopped outputs to the main onStopped output.


  5. Save the current Choregraphe movement by clicking on File -> Save project. Save the project as scratchmovement. Save your work frequently in Choregraphe.

  6. Both stand up and sit down are pre-made movements in Choregraphe. We will now make a movement from scratch. From the box list, select Templates -> Animation and drag and drop it onto the flow diagram between stand up and sit down. Connect the success output of Stand up to the onStart input of Animation. Connect the onStopped output of Animation to the onStart input of Sit Down.


  7. Double click on the Animation box to begin creating the movement from scratch.

  8. On the motion section, select time 10. This will be the time of the first movement. We could select any time greater than 1, but we cannot select 1 because that would indicate that the Nao should be in that position at the start of this box.


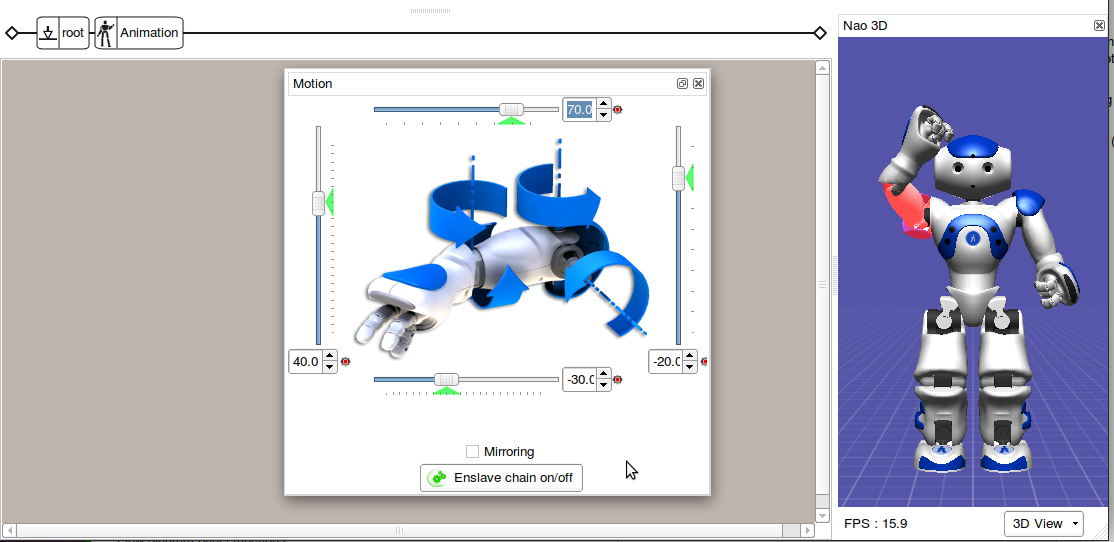
  9. Click on the Nao's upper right arm to open the 3D Nao panel.


  10. Set the value of the RShoulerPitch to -30.0 and the RElbowRoll to 70.


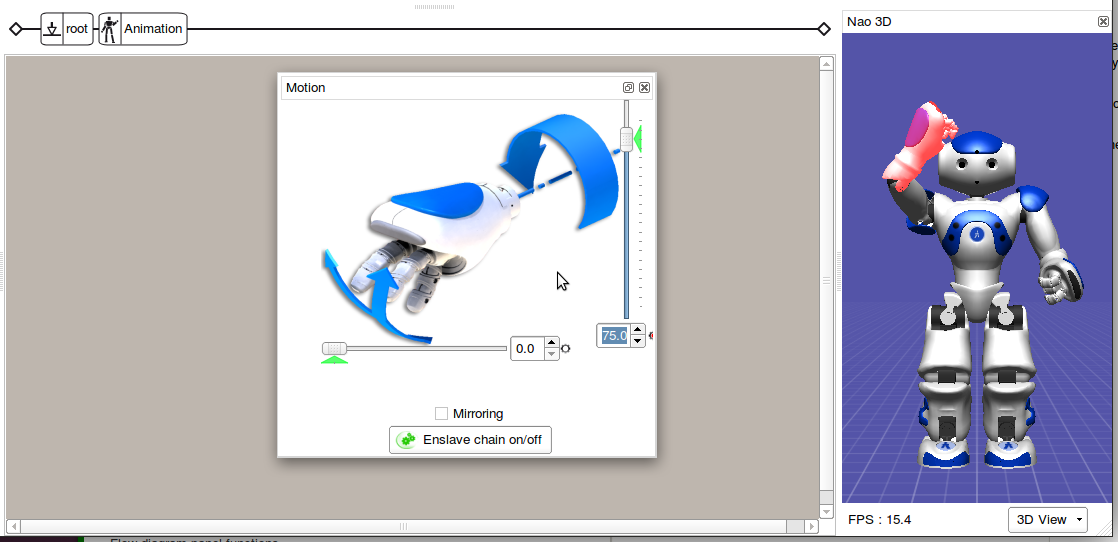
  11. Click on the Nao's lower right arm.


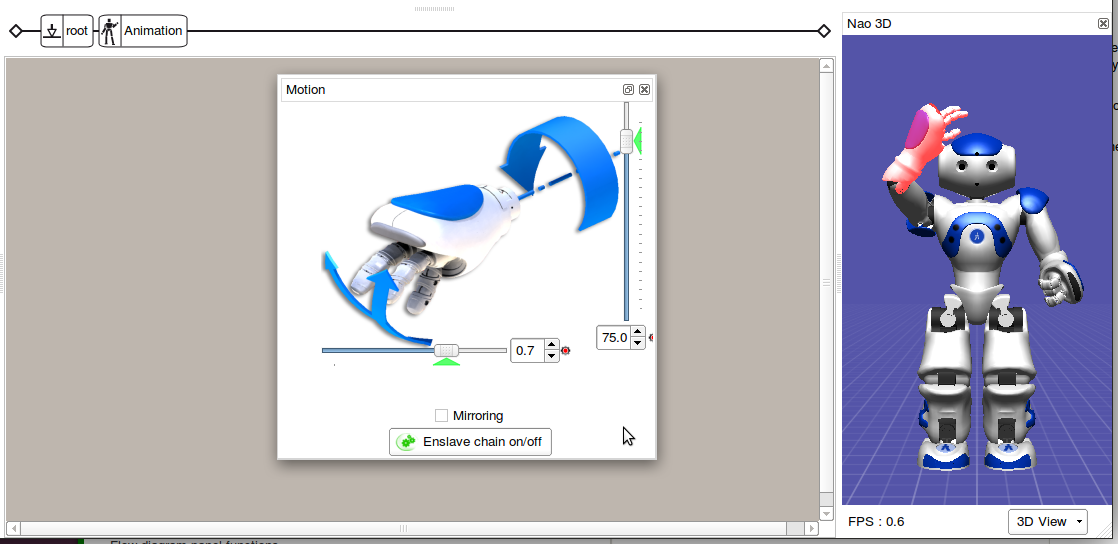
  12. Set the value of the RWristYaw to 75.0.


  13. Select time 20 in the motion section.

  14. Set the value of the RHand to 0.7.


  15. Select time 30 in the motion section.

  16. Set the value of the RHand to 0.0.

  17. Close the 3D Nao Motion Box and click on root in the flow diagram time line to return to the screen showing the Stand Up, Animation, and Sit Down boxes.

  18. If the Pose Library is not visible below the 3D Nao, click on View -> Pose Library. Then, click on Init in the pose library to return the 3D Nao to a standard pose.

  19. Click the play button to see the Nao perform the movement.

  20. To see an actual Nao perform the movement, turn on a Nao, wait for it to be ready to connect, and then connect using Choregraphe.

  21. Once connected, make sure the Nao has plenty of space to operate and that it will not become tangled in any stray cords (such as its own power cord).

  22. Press play to see the actual Nao robot perform the movement.

Monday, March 30, 2015

[Solved] Problem Installing tum_ardrone on ROS Indigo in Ubuntu 14.04


tum_ardrone is an important package to work on PTAM (Parallel Tracking and Mapping) so actually tum_ardrone works well in ROS version (fuerte / hydro/groovy) but as ROS Indigo is the recent version people prefer using ROS Indigo for its better features and its future compatibility.

Wednesday, March 18, 2015

Microsoft will let you upgrade to Windows 10 for free, even if you're running a pirated version


Microsoft stunning decision took over the people in the world and shocked all of them at once. People in the world celebrate this as they are getting a free upgrade to Windows 10.
In what may turn out to be an historic move in the battle against piracy, Microsoft's Terry Myerson has announced that the software vendor will allow all customers — whether they're running genuine Windows software or a pirated version — to upgrade to Windows 10 for free.

Windows 10 launching this summer in 190 countries

Sureply, people will love windows 10 for its features and look and mostly about the interface that was improved.
At the revived WinHEC conference in Shenzhen, China, Microsoft's Terry Myerson confirmed some of the Windows 10 launch information. It'll land this summer, in 190 countries and in 111 different languages.

How To Install Ubuntu 14.04 In Dual Boot Mode With Windows 8 Or 8.1 UEFI


I have covered how to install Ubuntu in dual boot with Windows 8 several times in the past. But what about uninstalling Ubuntu from Windows dual boot? Tutorial which we are going to follow here applies on any Linux OS be it Ubuntu, Linux Mint, Elementary OS or any other Linux distribution.
If you think installing Ubuntu with Windows 8 in dual boot was a tough task and it will be very easy to remove Ubuntu from Windows dual boot, you are not completely wrong. Uninstalling Linux from Windows dual boot is a piece of cake if you have a Windows installation disk.
This tutorial teaches you how to remove Linux completely from Windows 8 or Windows 8.1 dual boot with a Windows 8/8.1 installation disk.